
Still life composition: 8 principles for beautiful still lifes
Why does one arrangement of fruit look like a museum piece and another like a shopping list? It’s composition and light. Here are the eight principles I use in every still life, for painting and photography alike.
By Sander van Laar, Dutch artist making flower still lifes in the tradition of the Old Masters.
1. Choose one focal point
Every strong still life has one hero: the brightest flower, the shiniest glass, the cut lemon. Decide what it is before you start arranging. Everything else on the table is there to support it, so give it the best light and the clearest spot in the frame.
2. Build a triangle
The classic still life is built as a triangle or pyramid: one tall object at the back, medium objects beside it, small objects in front. A triangle feels stable and leads the eye up and down through the picture. Make it slightly asymmetrical so it doesn’t look stiff.
3. Work with odd numbers and overlap
Three pears look more natural than two or four. Odd numbers prevent the eye from pairing objects up. Let objects overlap slightly too: overlap creates depth and connects the parts into one group instead of a row of separate items.
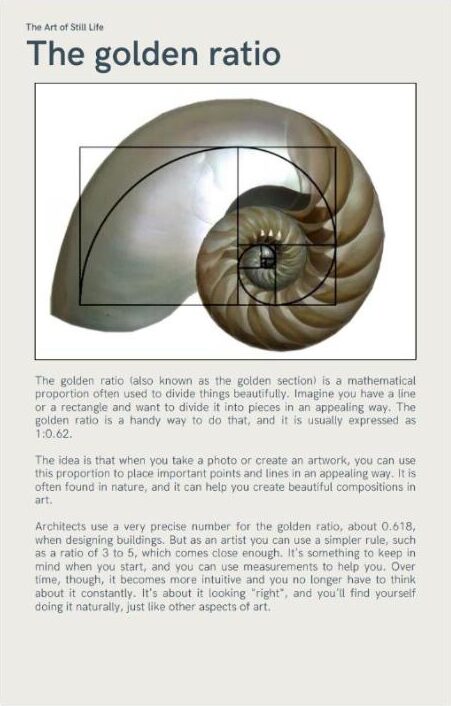
4. Use the golden ratio
Don’t put your focal point dead centre. Place it on one of the intersections of the rule of thirds, or more precisely along the golden spiral. It’s a proportion painters have used for centuries because it feels balanced but alive.
5. Create a line for the eye
A diagonal, a curve, a draped cloth, a stem that bends: lines guide the viewer through your still life. Flower painters of the Golden Age often built their bouquets on an elegant S-curve. A knife handle or a fruit peel hanging over the table edge points straight into the scene.
6. Leave negative space
The empty, dark area around your objects is not wasted. It gives them room to breathe and makes the composition calm. Beginners tend to fill the frame; try stepping back, or remove one object, and see how much stronger the rest becomes.
7. Limit your colours
Choose a palette of two or three main colours, ideally with one accent. Warm against cool works well: a red tulip among green leaves, a lemon against blue porcelain. Earth tones and a dark background give the deep, glowing feel of an Old Master painting.

8. Light from one side
Lighting a still life is simpler than it seems: use one soft light, from the side and slightly above. A north-facing window is ideal; otherwise hang a thin white curtain in front of the glass. The light should fall at about 45 degrees, so every object gets a bright side, a midtone and a shadow. That gradient is what makes things look three-dimensional.
- Bounce: a white card opposite the window softens the shadows.
- Flag: black card on the other side deepens them, for more drama.
- Background: keep it darker than your subject, and a little further away, so it falls off into shadow.
- Avoid: overhead room lights, direct sunlight and on-camera flash.
The Art of Still Life
Composition, lighting, colour and Dutch Golden Age symbolism, explained step by step with examples and exercises. Written for beginners in still life photography and painting.
Discover the e-book · €24.99Practise: a 30-minute composition exercise
- Choose five objects of different sizes and one focal point.
- Set up next to a window with a dark background and turn off all other lights.
- Build a triangle, take a photo.
- Remove one object, take a photo. Move the focal point to a third, take a photo.
- Compare the results side by side. Which one holds your eye longest, and why?
Looking for subjects? Try my 20 still life photography ideas, or study how the masters did it in 10 Dutch Golden Age flower paintings.
Frequently asked questions
What makes a good still life composition?
A clear focal point, objects of varying height and size grouped in a loose triangle, a limited colour palette, enough empty space and one soft, directional light source.
What is the best light for a still life?
Soft side light from a single window, coming from slightly above and to the left or right. It models the shapes of the objects and creates gentle shadows. Avoid direct sunlight and on-camera flash.
Is still life composition the same in painting and photography?
The principles are the same: balance, rhythm, light and focus. A painter can move things on the canvas, while a photographer arranges the real objects, so careful set-up is even more important in photography.
Still lifes in the spirit of the Old Masters
These are the same principles I use in my own flower still lifes, available as fine art prints and on acrylic glass.